Label the Microscope
Tap a marker on the microscope and pick the part it belongs to. There are ten markers, running from the eyepiece at the top down to the base. This is a classic teaching microscope drawn as a cutaway, so you can see the lenses and the path the light takes. Two things to know first: it uses a tilting mirror instead of a built-in lamp, and the angled tube on the right is a second objective turned out of the way.
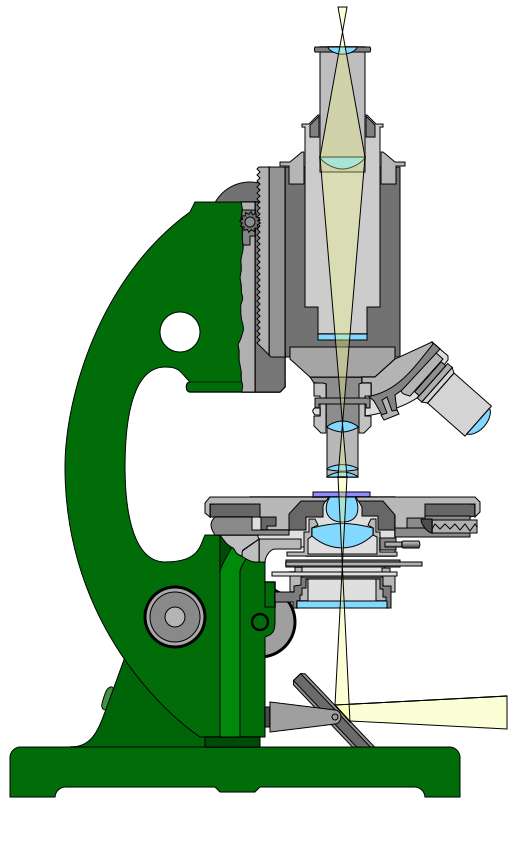
Pick the name of the highlighted marker.
All High School & Admission quizzes
- Labeling quiz · 10 labels
Label the Animal Cell
- Labeling quiz · 10 labels
Label the Plant Cell
- Practice test · 15 questions
AP Biology Study Guide
Now make your own
Upload your prep book, slides or notes, or just tell Bo what you want to learn. You do not need a document to start.
All 10 labels on this diagram
Every marker on the figure is listed below with what it does. Answers stay collapsed until you open them, so you can quiz yourself as you scroll.
1. Eyepiece
Show answer
The lens you look into, also called the ocular. It magnifies the image the objective has already made, most often by 10 times, which is why 10x is printed on so many of them.
2. Body tube
Show answer
The tube that holds the eyepiece at the top and the nosepiece at the bottom. It keeps the two lens systems the right distance apart, and on this microscope the whole tube moves up and down when you focus.
3. Coarse focus knob
Show answer
The large knob that moves the tube or stage a long way with each turn, for finding the specimen at low power. On this drawing you see the edge of the knob above the arm, and in the cutaway the small gear it turns against the toothed rack on the tube.
4. Revolving nosepiece
Show answer
The rotating mount that holds the objectives. Turning it clicks a different objective into the light path, which is how you change magnification. Here one objective points down and a second one is turned out to the side.
5. Objective lens
Show answer
The lens closest to the specimen and the one that does most of the magnifying. School microscopes usually carry 4x, 10x and 40x objectives, sometimes with a 100x oil immersion lens as well.
6. Stage
Show answer
The flat platform the slide lies on, with a hole in the middle so light can pass up through the specimen. On this drawing the thin purple strip on top of it, right under the objective, is the slide.
7. Condenser
Show answer
The lens system under the stage that gathers the light and focuses it onto the specimen. Without it the light would spread out and the image at high power would be dim and flat.
8. Mirror
Show answer
The light source on this microscope. You tilt it to catch light from a window or a lamp and bounce it up through the condenser, which is the pale beam you can see on the drawing. Most microscopes built today have a lamp in the base instead.
9. Arm
Show answer
The curved frame that connects the head of the microscope to the base. It is the part you hold when you carry the microscope, with your other hand under the base.
10. Base
Show answer
The heavy foot the whole microscope stands on. Its weight keeps the instrument steady, and on a microscope with a built-in lamp the light source usually sits inside it.
Follow the light and the parts fall into order
A microscope is easier to label if you follow the light instead of memorizing shapes. The light only travels one way, and almost every part sits on that path.
It starts at the light source, here the mirror at the bottom. It passes up through the condenser, which focuses it, and through the slide lying on the stage. It enters the objective lens, travels up the body tube and comes out of the eyepiece into your eye. That one sentence names six of the ten markers in order.
The path also explains magnification. The objective makes a magnified image and the eyepiece magnifies it again, so you multiply the two numbers. A 10x eyepiece with a 40x objective gives 400x. The other four markers hold and move everything else: the nosepiece swaps the objectives, the coarse focus knob moves the lenses up and down, and the arm and base carry it all.
What this drawing shows that your lab microscope might not
This is an older design, and three things about it differ from the microscope you may use in class.
The light source is a mirror. You tilt it toward a window or a desk lamp, and the drawing shows the beam coming in from the right and turning upward. A modern microscope has a lamp built into the base and a switch or dial for brightness, but the job is the same: get light up through the specimen.
The nosepiece shows two objectives, one in use and one turned aside. Real nosepieces usually hold three or four. Just under the condenser you can also see two thin plates with a lever sticking out to the right. That is the iris diaphragm, which opens and closes to control how much light reaches the slide. It is too thin to pin here, but it is a common exam label, so learn where it sits.
Two parts are not marked. The fine focus knob moves the lens only a tiny distance per turn and is the one you use at high power. Stage clips, the springs that hold the slide flat, are found on most school microscopes. Many lab sheets ask for both, so check where they are on the microscope you actually use.
How StudyPDF turns your own lab material into labeling practice
One drawing with ten markers gets you through this quiz. A lab practical will use the microscope in your room and the labels your teacher taught, and they may not match a textbook figure exactly.
StudyPDF works from your material instead. Upload your lab manual, the worksheet or your class slides, and Bo, the study agent, builds practice from those exact pages, including the diagrams in them. Every explanation cites where the answer came from, so you can check it against the page.
You do not need a file to start. Name a topic instead, for example microscope parts and their functions, and Bo sets up practice on it. Starting is free.
Written by the StudyPDF team. Last updated 2026-08-19.