Etiqueta el diagrama del ojo
Las etiquetas se quedan en inglés.
Toca un marcador del ojo y elige la parte a la que apunta. Hay doce, desde la córnea delante hasta el nervio óptico detrás. La figura muestra el ojo cortado por la mitad en horizontal, así que la parte delantera del ojo queda arriba en la imagen y la luz lo atraviesa hacia abajo hasta la retina.
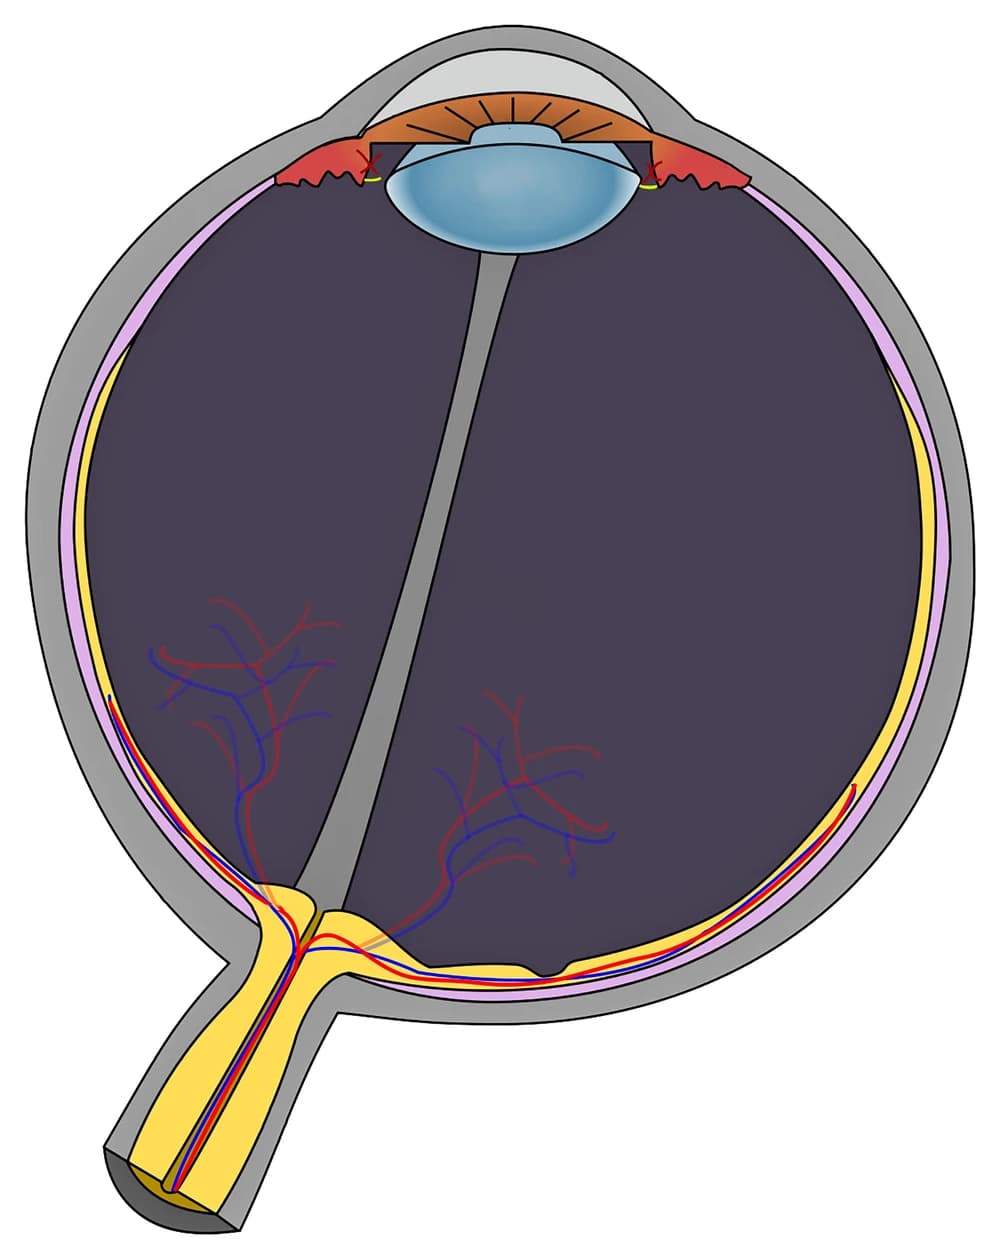
Elige el nombre del punto marcado.
Todos los tests de Enfermería y salud
- Cuestionario de etiquetado · 10 etiquetas
Etiqueta la neurona
- Cuestionario de etiquetado · 10 etiquetas
Etiqueta el diagrama del corazón
- Test de práctica · 15 preguntas
Test de práctica de anatomía y fisiología
Crea el tuyo
Sube tu libro de preparación, tus diapositivas o tus apuntes, o dile a Bo qué quieres estudiar. No necesitas ningún documento para empezar.
Las 12 etiquetas de este diagrama
Abajo están todos los marcadores de la figura con su función. Las respuestas quedan plegadas para que puedas autoevaluarte mientras bajas.
1. Cornea
Ver respuesta
The clear dome at the very front of the eye. It does most of the focusing, about 70 percent according to the American Academy of Ophthalmology, and the lens only fine tunes what the cornea has already bent. On this figure it is the curved band across the top, where the gray outer wall turns transparent.
2. Aqueous humor
Ver respuesta
The watery fluid filling the front of the eye between the cornea and the lens, most of it in the anterior chamber between the cornea and the iris. The ciliary body makes it all the time and it drains away at the angle where the iris meets the cornea, and that balance is what keeps the pressure inside the eye steady.
3. Iris
Ver respuesta
The colored ring you see when you look at someone's eye. It is a muscle: one set of fibers narrows the pupil in bright light and another widens it in the dark. In a cross-section it shows up as the two brown flaps lying in front of the lens.
4. Pupil
Ver respuesta
The opening in the middle of the iris. It is not a structure at all, just a hole, which is why it looks black from the outside. Here it is the gap between the two halves of the iris, where the front of the lens shows through.
5. Lens
Ver respuesta
The clear, flexible disc behind the pupil. Thin threads called zonules hold it to the ciliary body, and when the ciliary muscle contracts, those threads slacken and the lens rounds up to focus on something close. It stiffens with age, which is why reading glasses often arrive in your forties.
6. Ciliary body
Ver respuesta
The red ring of tissue just behind the iris, on both sides of the lens. It does two jobs: its muscle changes the shape of the lens for near and far focus, and its lining produces the aqueous humor.
7. Sclera
Ver respuesta
The tough outer wall of the eyeball, the part you see as the white of the eye. It keeps the eye's shape and gives the six muscles that move the eye something to pull on. At the front it continues into the cornea.
8. Choroid
Ver respuesta
The thin layer of blood vessels between the sclera and the retina, shown here in pink. It feeds the outer layers of the retina, and its dark pigment soaks up stray light so it does not bounce around inside the eye.
9. Retina
Ver respuesta
The light sensitive lining at the back of the eye, shown in yellow. Its rods handle dim light and its cones handle color and fine detail, and together they turn light into nerve signals. On the figure it is the innermost of the three layers in the wall.
10. Vitreous body
Ver respuesta
The clear gel filling the big chamber between the lens and the retina, which is most of the eyeball. It holds the retina in place against the wall. The gray strip running through it on this figure is the hyaloid canal, a leftover from development.
11. Fovea
Ver respuesta
The small pit in the retina almost straight behind the lens, at the center of the macula. It is packed with cones and has no rods at its center, so it gives the sharpest vision you have. Whatever you look at directly is focused here.
12. Optic nerve
Ver respuesta
The cable of about a million nerve fibers carrying signals from the retina to the brain. The spot where it leaves the eye, the optic disc, has no rods or cones, which is what creates the blind spot in each eye.
Tres capas, dos líquidos y un cristalino
En un diagrama el ojo parece complicado, pero casi todas sus partes encajan en un plan sencillo, y ese plan es lo que evalúan los exámenes.
La pared del ojo tiene tres capas. La externa es dura y protectora: la esclerótica rodea casi todo el globo ocular y se convierte en la córnea transparente por delante. La media lleva el riego sanguíneo y los músculos: la coroides detrás, el cuerpo ciliar más adelante y el iris justo delante. La interna es la retina, la única parte que de verdad detecta la luz. En esta figura se ven las tres como bandas apiladas a lo largo de la pared: gris, luego rosa, luego amarilla.
El interior lo divide el cristalino. Delante está el humor acuoso, un líquido fino que se produce y se drena sin parar. Detrás está el cuerpo vítreo, un gel que se queda en su sitio. Los dos se distinguen fácil si recuerdas que acuoso significa parecido al agua y que está delante, donde puede circular.
La luz sigue siempre el mismo orden: córnea, humor acuoso, pupila, cristalino, cuerpo vítreo, retina. Si te sabes ese recorrido, puedes situar la mayoría de los marcadores en cualquier diagrama del ojo aunque no lo hayas visto antes.
Las partes que se confunden y lo que sale en la figura sin marcar
La mayoría de puntos perdidos en un diagrama del ojo vienen de unas pocas parejas.
Iris y pupila. El iris es el músculo de color y la pupila es el agujero que tiene en el centro. Un marcador sobre la abertura siempre es la pupila, y un marcador sobre el tejido que la rodea siempre es el iris.
Córnea y esclerótica. Son una sola pared externa continua, transparente por delante y blanca en todo lo demás. La córnea es solo la ventana transparente del frente.
Coroides y retina. Las dos son capas finas por dentro de la esclerótica. La coroides es la del medio y lleva sangre, y la retina es la más interna y capta la luz. Si dudas, la retina es la capa que toca el vítreo.
Fóvea y disco óptico. Los dos están al fondo. La fóvea es el punto de visión más nítida, y el disco óptico es donde sale el nervio y no hay visión ninguna. En esta figura, el disco óptico está donde el nervio óptico amarillo se une a la pared, a la izquierda de la fóvea.
Algunas estructuras se ven pero no están marcadas a propósito: el propio disco óptico, la zónula (los hilillos amarillos cortos que sujetan el cristalino), los vasos sanguíneos de la retina en rojo y azul, y el conducto hialoideo, la franja gris que va del cristalino al disco óptico. La mácula, la zona que rodea la fóvea, es demasiado pequeña para mostrarse como región propia a esta escala.
Cómo StudyPDF convierte tus propios diagramas en práctica de etiquetado
Doce marcadores en una figura son un buen comienzo. Un examen de biología o un práctico de anatomía usará el diagrama de tu propio libro o de tus diapositivas, a menudo una vista frontal del ojo o un primer plano de la retina, con las etiquetas que eligió tu profesor.
StudyPDF parte de tu material. Sube el capítulo, las diapositivas de clase o la ficha. Si tus diapositivas tienen un diagrama del ojo con etiquetas, puedes convertirlo en tarjetas de oclusión de imagen desde el formulario de Nuevo material: las etiquetas quedan tapadas y tú recuerdas cada una. Los cuestionarios y los tests de práctica salen de esas mismas páginas, y cada explicación cita de dónde salió la respuesta. Bo, el tutor, te explica desde tus propias páginas cualquier parte que falles.
No necesitas un archivo para empezar. Nombra un tema, por ejemplo las partes del ojo y sus funciones o cómo enfoca el ojo, y Bo lo prepara para que puedas crear práctica a partir de él. Una cuenta gratis cubre unos cuatro materiales nuevos por semana, y Pro y Ultra cubren más.
Escrito por el equipo de StudyPDF. Actualizado el 2026-08-19.